A Quick Guide to Making Indie Game Trailers
Making a trailer may sound like a daunting task to the average indie, but it’s not that complicated to make a simple one, and it can be a worthwhile creative exercise in itself. Below you will find a guide to making indie game trailers as written by Ryan Sumo (the lead artist/CEO of Squeaky Wheel)
—
September 18, 2017
Conceptualization
This part is the easiest, just watch and absorb a bunch of trailers. Since we’re working on an Early Access game that has simulation/management aspects, I chose to watch trailers by games like Sim Airport, Another Brick in the Mall, Production Line, and Oxygen Not Included. My main takeaway from these trailers is that they all showed elements of construction and showed the games’ complexity. A basic idea for the Academia trailer was now forming in my mind. I envisioned a student dreaming of building their school, with the music starting quiet and then building up in complexity as the school gets built out. With this in mind, the next step for me was to find some good music.
Music
There are lots of great composers out there, and you can approach one if you want a custom piece of trailer music. But coming up with a great composition takes both time and money, which we had in short supply. Luckily, there’s a surplus of good royalty free music out there.
I initially checked out Nash music, which is where we found the background music for our game (which we also use in our devlogs). I couldn’t find what I wanted so I did a google search for royalty free music and searched “educational” or “education” to see what would turn up. To my surprise, I found the trailer music on Shutterstock, which apparently now also licenses music tracks apart from photos.
When I first heard the track “Keep Riding” my ears instantly perked up, and I thought “this is it!” I did my due diligence by searching for other tracks. Shutterstock makes this easier by showing the track’s waveform, so I could immediately see if any other tracks I was checking out had the similar “building up” phase at the beginning. I couldn’t find anything else that called out to me, and after sharing with the team and getting the signal from them, I bought the track.
Pro tip: before buying ANYTHING online, make sure to do a cursory google search for discount coupons. I do this for everything from booking hotels to buying royalty free music, and in this case, I got a sweet 15% discount from a random coupon site.
Storyboard
Now that I had my music ready, it was time to take my initial concept and prepare some storyboards. Storyboards are your trailer in following drawings. If it helps you can think of storyboards as like a comic book of your trailer. Storyboards help you plot out the action of the trailer very quickly allowing you to figure out exactly what assets you’ll need to create for the trailer. In our case, it helped me identify that I needed to make a background image, some custom sprite art, and locked down the list of videos that I needed to record. Another thing that’s important when making trailers is deciding what kind of transitions to use in the trailers.
Transitions
I wanted to detour a little bit into talking about transitions because I think while they’re well known to anyone with interest in film, developers aren’t aware of them. I certainly didn’t have in-depth knowledge of transitions until I experimented with making an alternate trailer for our game Political Animals. Mostly, transitions exist to smoothen or make more natural the transition from one scene to another.
This video of cuts and transitions 101 is a great watch and explains a lot about transitions in just 12 minutes. Depending on the kind of game you’re making, only some of these transitions will be very useful to you, but it’s important to keep them in mind in case they affect the kind of recordings you want to make. In my case, I ended up using wipes, jump cuts, and the generic fade in/out from scene to scene.
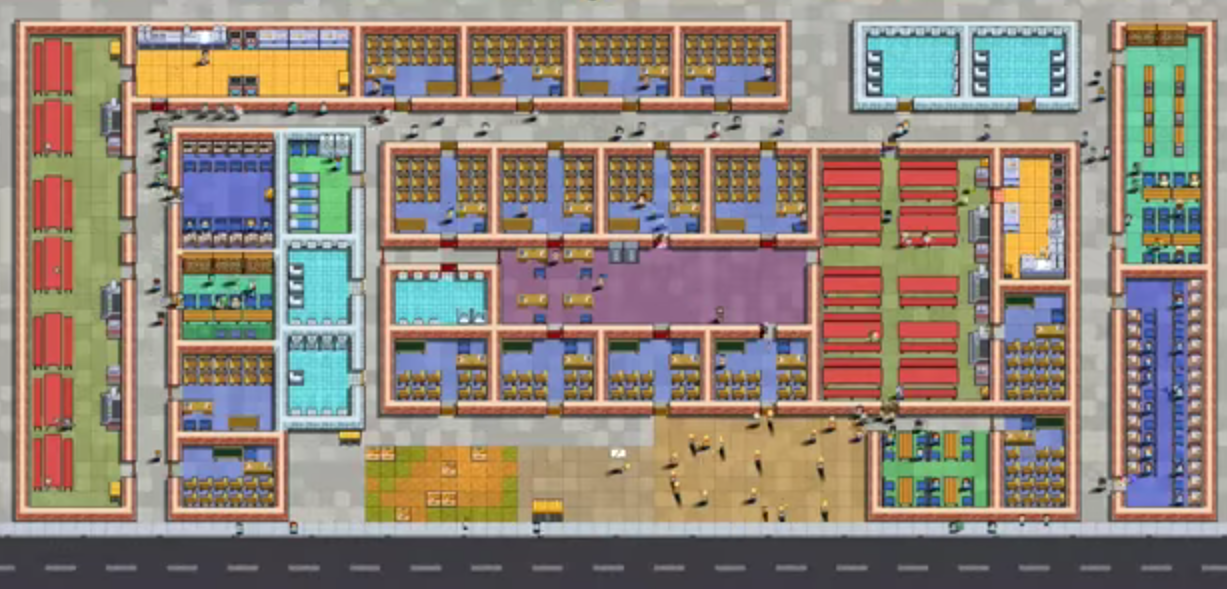
I used jump cuts (with a slight fade in) specifically for the section of the trailer where I wanted to show the school being built up [visit original article].
And I used wipes (with a little bit of cutting on the action) for a section where I showed off closeups of different zones while panning the camera.
Transitions can give your trailer a sense of movement, something that a game like ours is sorely lacking. A well-placed transition can be the difference between a great trailer and a meh trailer.
Recording Video and Preparing Assets
I needed to prepare some assets for the video, which was simple enough since a lot of our assets are created in vector anyway, and it was easy fairly for me to resize them and save them as PNGs for use in the video.
For recording the video, I used FRAPS. While I use OBS for our other recordings like for our devlogs, I’ve had difficulty getting it to record in the best possible quality. FRAPS’ biggest issue is that it records videos with HUGE file sizes. But once that video is encoded in the process of editing it all gets compressed down to a manageable size, based on your parameters.
Editing the Video
If there is interest, I will do a deeper dive into the specifics of the editing process. But for brevity’s sake, this is a very condensed version of what goes into the editing process.
Adobe Premiere is the recognized king of video editing software, but there are a lot of alternatives out there. I settled on Power Director because it was a great value while at the same time offering a lot of editing power and customized transitions. Don’t let the crappy website design fool you, at $59 for a one-time purchase it’s quite a good piece of software!
If you went through the process properly, then the first draft of the editing process should be pretty straightforward. The most complicated part of this trailer was the first part because it involved a lot of timing and movement between the different sprites. But if you’re just using recorded video, only add the recorded media in the proper order by clicking and dragging them to the timeline. Now add the background music. Choose transitions and add them in between the scenes, then click on play to watch the entire trailer.
After watching the first draft, I noticed a couple of things. One of the transitions occurred just as a lot of basses was played in the music. This made for very pleasant timing with the transition, so I went in and edited the scenes to transition at the same time as the music. I also felt that there could be a little bit of text to guide the viewer as to what was going on in the scene, so I added some text transitions. I watched the second draft and decided I was satisfied. After that, it was a matter of adjusting the parameters of the final video to try to keep the filesize small, mostly because the Philippine internet is terrible and it takes forever to upload videos to youtube.
Conclusion
I wrote this blog to encourage indie devs who can’t afford a professional video editor to try their hand at making their trailers. I kept inferior track of time on this, but I think it took me about 2-3 days to make the trailer. Other than the fact that I saved us some money, I enjoyed the process and learned a new skill that may come in useful somewhere down the line.
Recent Comments